我的应用采用的是ruoyi-vue-pro,无意中发现带了很多http后缀的文件,搜了一下看了日拱一兵 IntelliJ IDEA的这个接口调试工具真是太好用了!这篇blog,知道了是 IntelliJ IDEA 的 HTTP Client,就拿来研究了一下。
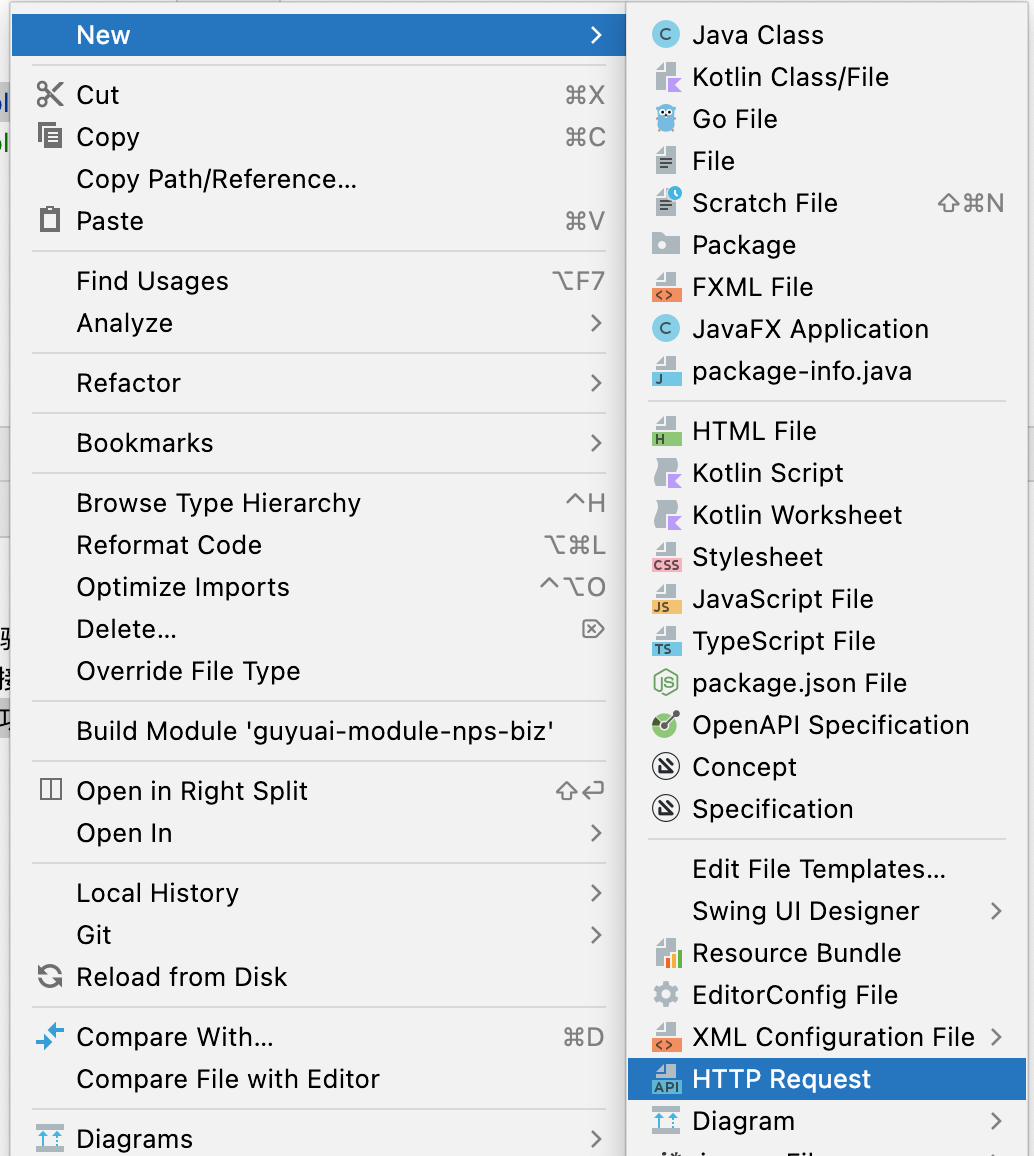
新建http client
在idea中新建文件中找到HTTP Request.
环境变量
注:很多都是拿ruoyi-vue-pro的例子
环境变量需要定义在环境文件中,环境文件有两种:
- 创建名为
http-client.env.json 的环境文件(其实里面就是保存 JSON 数据),该文件里可以定义用在整个项目上的所有常规变量
- 也可以创建名为
http-client.private.env.json, 看文件名你应该也猜到这是保存敏感数据的,比如密码,token等,该文件默认是被加入到 VCS 的 ignore文件中的,同时优先级高于其他环境文件, 也就是说,该文件的变量会覆盖其他环境文件中的变量值
里面的文件内容就像这样
1
2
3
4
5
6
7
8
9
10
11
12
13
14
15
16
17
18
19
20
21
| {
"local": {
"baseUrl": "http://127.0.0.1:48080/platform/admin-api",
"token": "test1",
"adminTenentId": "1",
"appApi": "http://127.0.0.1:48080/platform/app-api",
"appToken": "test1",
"appTenentId": "1"
},
"gateway": {
"baseUrl": "http://127.0.0.1:8888/platform/admin-api",
"token": "test1",
"adminTenentId": "1",
"appApi": "http://127.0.0.1:8888/platform/app-api",
"appToken": "test1",
"appTenentId": "1"
}
}
|
注:下面的用例都是参照日拱一兵 来弄。
使用 response handler 脚本
我们要让登录成功后的所有请求都自动携带成功返回的 Token,这样不用我们每次都手动将其添加到header中,我直接把返回的json信息中的accessToken写入环境变量,就是用’>’开头,后面用类似于模板标签的方式框住 js 脚本
1
2
3
4
5
|
> {%
client.global.set("token", response.body.data.accessToken);

%}
|
编辑 HTTP request 文件
我们模拟实际项目中场景来编辑文件
- 用户登录,成功后获取 Token,通常是 POST 请求
- 用户后续访问行为都要在请求头中携带登录成功返回的 Token
通过点击 Add Request,选择相应的方法就可以编写啦
登录
1
2
3
4
5
6
7
8
9
10
11
12
13
14
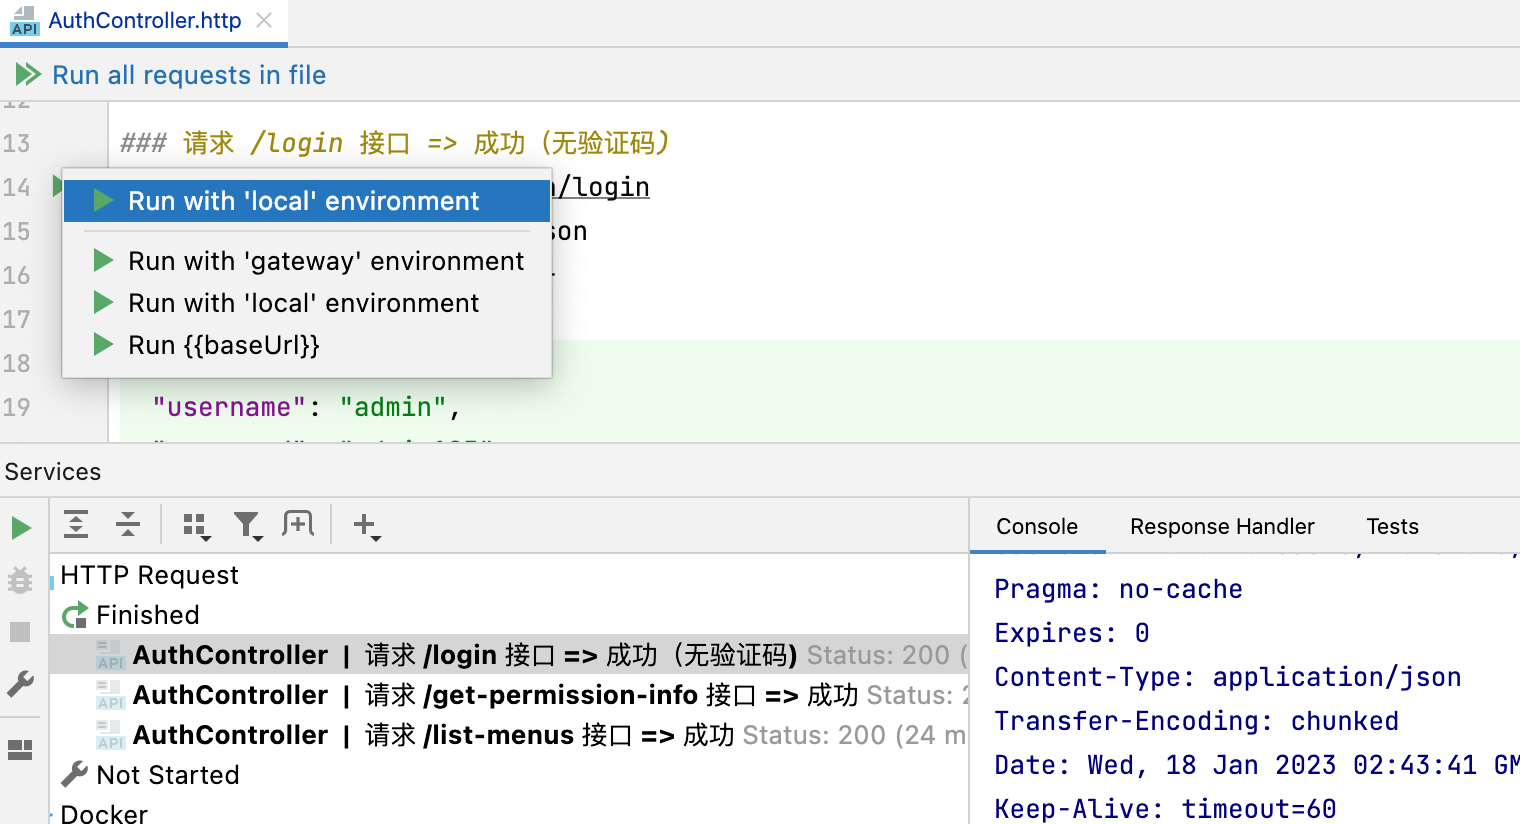
| ### 请求 /login 接口 => 成功(无验证码)
POST {{baseUrl}}/system/auth/login
Content-Type: application/json
tenant-id: {{adminTenentId}}
{
"username": "admin",
"password": "admin123"
}
> {%
client.global.set("token", response.body.data.accessToken);
%}
|
执行
1
2
3
4
5
6
7
8
9
10
11
12
13
14
15
16
17
18
19
20
21
22
23
24
25
26
27
28
29
30
31
32
33
| http://{{baseUrl}}/system/auth/login
HTTP/1.1 200
Vary: Origin
Vary: Access-Control-Request-Method
Vary: Access-Control-Request-Headers
trace-id:
X-Content-Type-Options: nosniff
X-XSS-Protection: 1; mode=block
Cache-Control: no-cache, no-store, max-age=0, must-revalidate
Pragma: no-cache
Expires: 0
Content-Type: application/json
Transfer-Encoding: chunked
Date: Wed, 18 Jan 2023 02:43:41 GMT
Keep-Alive: timeout=60
Connection: keep-alive
{
"code": 200,
"data": {
"userId": 1,
"accessToken": "85f67291fcb54d65b9dffd35098ceafb",
"refreshToken": "c14484195eec4d8ca0548e22ff6858a5",
"expiresTime": "2023-01-18 11:13:41"
},
"message": ""
}
Response file saved.
> 2023-01-18T104341.200.json
Response code: 200; Time: 138ms; Content length: 180 bytes
|
然后后续使用这个token
获取权限信息这里需要使用刚才返回的 token
1
2
3
4
5
6
7
8
9
10
11
| ### 请求 /get-permission-info 接口 => 成功
GET {{baseUrl}}/system/auth/get-permission-info
Authorization: Bearer {{token}}
tenant-id: {{adminTenentId}}
### 请求 /list-menus 接口 => 成功
GET {{baseUrl}}/system/auth/list-menus
Authorization: Bearer {{token}}
#Authorization: Bearer a6aa7714a2e44c95aaa8a2c5adc2a67a
tenant-id: {{adminTenentId}}
|
执行结果虽然没有显示发送的header,但是可以看到认证成功了。
1
2
3
4
5
6
7
8
9
10
11
12
13
14
15
16
17
18
19
20
21
22
23
24
25
26
27
28
29
30
31
32
33
34
35
36
37
| http://{{baseUrl}}/system/auth/get-permission-info
HTTP/1.1 200
Vary: Origin
Vary: Access-Control-Request-Method
Vary: Access-Control-Request-Headers
trace-id:
X-Content-Type-Options: nosniff
X-XSS-Protection: 1; mode=block
Cache-Control: no-cache, no-store, max-age=0, must-revalidate
Pragma: no-cache
Expires: 0
Content-Type: application/json
Transfer-Encoding: chunked
Date: Wed, 18 Jan 2023 02:43:56 GMT
Keep-Alive: timeout=60
Connection: keep-alive
{
"code": 200,
"data": {
"user": {
"id": 1,
"nickname": "老王",
"avatar": "http://127.0.0.1:48080/platform/admin-api/infra/file/5/get/ef30195d8b2cd33a1d8233dfe6ea5881ca868b94b5dcf93be8cb78ba5151b8c7.jpg"
},
"roles": [
"common",
"super_admin",
"ACTUATOR"
],
"permissions": [
"",
"infra:config:create",
"bpm:task-assign-rule:create",
"system:user:query",
"system:error-code:query",
|
完事
到这里基本差不多了,后续对需要测试的接口一个个写就行了,方便的地方就是一直在idea中写,不用打开postman。