传统windows下面的文件,很多老的项目中文件编码有gb2312的,也有unicode的,在vscode中修改的话经常会出错,因为写了个小脚本,把所有非unicode编码的文件统一改为unicode编码。
1 | # -*- coding:utf-8 -*- |
传统windows下面的文件,很多老的项目中文件编码有gb2312的,也有unicode的,在vscode中修改的话经常会出错,因为写了个小脚本,把所有非unicode编码的文件统一改为unicode编码。
1 | # -*- coding:utf-8 -*- |
老的项目中使用了1.6.x的jquery,需要升级其中的弹窗为layui,但是layui需要至少1.10.x,修改方式如下,将原来单行的jquery引用,改为保护多版本jquery,添加layui引用,最后恢复原来的jquery版本号,确保不影响原来其它jquery使用的地方。
1 | <script src="../js/jquery-1.3.2.min.js" type="text/javascript"></script> |
1 | <script type="text/javascript" src="../js/lib/jquery.js"></script> |
顺便做一个批量替换的脚本
1 | # -*- coding:utf-8 -*- |
s3 minio学习
直接采用docker方式运行,docker-compose.yml
1 | version: '3' |
然后nginx做反向代理
1 | server { |
客户端学习
下载mc客户端
1 | curl --progress-bar -O https://dl.min.io/client/mc/release/darwin-arm64/mc |
macos m1miniconda使用python2.7
conda create -n python27 python=2.7 anaconda
1 | CONDA_SUBDIR=osx-64 conda create -n py27 python=2.7 |
系统安装docker,然后在执行如下命令
1 | docker run -it --rm --name certbot \ |
其中/var/lib/www是域名静态根目录,期间提示号域名的根目录的时候输入 /www
正常的话会将证书放到/etc/letsencrypt目录下。
macbook silicon 运行kettle(data-integration)
kettle在windows及intel电脑运行正常,但是在silicon芯片的macos上执行是提示:不支持arm64。搜索 发现解决方案: https://medium.com/@gabriella.mayang/how-to-install-and-open-pentaho-data-integration-on-macbook-m2-apple-silicon-4081c2875a02
I tried JDK from Oracle but it failed. Now the only JDK that I am using and proven successful in opening PDI in my M2 is the one from Eclipse Temurin OpenJDK.
就是把下载的文件放到 data-integration/libswt/osx64 目录下。
注:这里是苹果原生的terminal,不是iterm。
1 | env /usr/bin/arch -x86_64 /bin/zsh --login |
Uncheck ‘Run inside shell’. Uncheck the checkbox would prevent running the shell twice, which could bloat your environment variables since ~/.zshrc gets run twice
因为我用了多版本的jdk,所以需要单独设置一个java环境
1 | export JAVA_HOME=/Library/Java/JavaVirtualMachines/temurin-8.jdk/Contents/Home |
然后就成功了。
解决 访问http自动跳转到https的问题
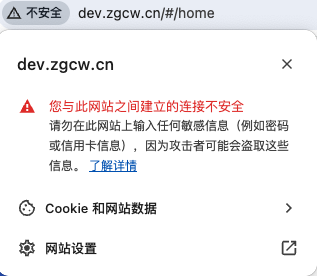
1、先访问http域名,然后点击地址栏所测那个“不安全”的警告,弹出对话框中选择网站设置,
2、然后再下面的不安全内容后面的下拉框中选择允许

3、在地址栏输入: chrome://net-internals/#hsts
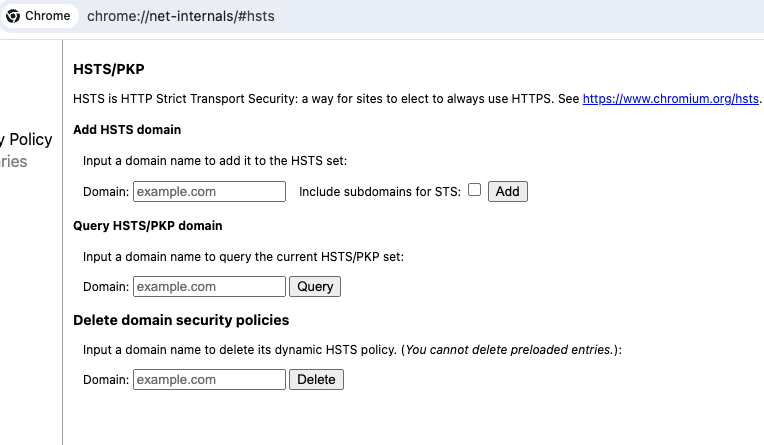
4、找到底部Delete domain security policies一栏,输入想处理的域名,点击delete。
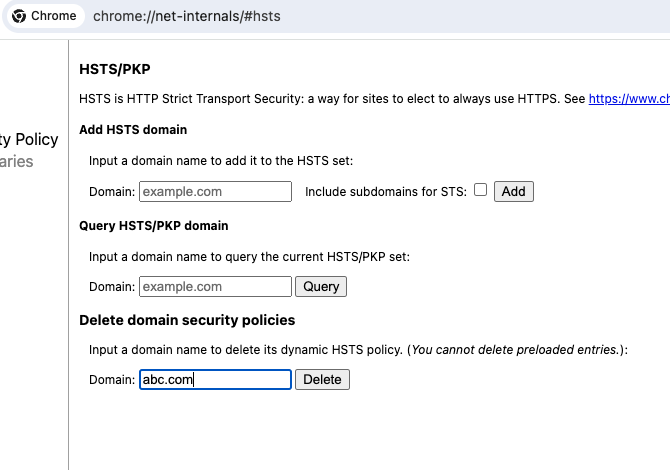
5、搞定了,再次访问http域名不再自动跳转https了。
pytorch学习之路
pytorch包含以下组件
torch: 一个像numpy 向量库
torch.autograd 自动微分库,支持所有微分向量运算
torch.jit 一个编译栈,从pytorch代码来创建可序列化、可以优化的模型
torch.nn 神经元网络库,设计之初保持了最大化灵活性,深度继承了求导库
torch.multiprocessing 多处理,在torch 向量访问处理器时使用了魔术化的内存共享。在数据加载和疯狂的训练模型的时候非常有用。
torch。utils 数据记在和其他功能
通常pytorch用作两个方面:
1、替代numpy来使用gpu
2、提供最大灵活性和速度的深度学习研究平台
动态神经元网络:使用磁带记录仪回放这种独特的方法来创建神经元网络。
pytorch使用反向模式自动微分技术,让我们经常零成本的改变网络行为;我们的灵感来自于这篇文章的几个研究报告。
这个技术不是pytorch独有的。这是目前为止最快速的实现。你可以为你疯狂的研究获得最快的速度和灵活性。
pytorch不是一个整体绑定到 c++框架的。他是深度集成到python中。你可以像使用numpy scipy scikit-learn一样自然的使用它。你可以写你自己全新神经元网络,使用你喜欢的库和包。我们的目标是不重复造轮子。
必要的经验
pytorch设计为只觉得、线性的思考、简单易用。当你执行一行代码,他被执行了。在现实世界中他不是异步视图。当你调试一行代码或者接收到错误信息和堆栈跟踪,理解他们是很直观的。堆栈调用之初你的代码在哪里被定义。我们希望你不要因为坏的堆栈调用、异步执行和不透明的执行引擎而花费时间调试你的代码。
快速和学习
pytorch有最小的框架成本。我们继承了加速库像intel MKL 和nvidia(cuDNN nccl)去最大化速度。最核心的,他核心的cpu gpu向量和神经元网络是成熟的并且经过多年测试的。
因此,pytorch是非常快的,无论执行小规模还是大规模的模型。
无痛扩展
二进制,命令行通过conda 或者pip 安装 参照: https://pytorch.org/get-started/locally/
源代码安装
需要满足:python 3.8+;编译器全面支持C++17,像clang或者gcc(gcc 9.4.0或者最新)
强烈推荐安装conda环境。
如果想要编译cuda支持,从我们的支持矩阵里选择一个我们支持的版本select a supported version of CUDA from our support matrix。然后安装nvidia cuda ,nvidia cuDNN v8.5 + ,CUDA兼容的编译器。
如果要禁用CUDA,设置环境变量 USE_CUDA=0 .其它有用的环境变量在setup.py中。
1 | git clone --recursive https://github.com/pytorch/pytorch |
通用
1 | conda install cmake ninja |
On Linux
1 | conda install intel::mkl-static intel::mkl-include |
On MacOS
1 | # Add this package on intel x86 processor machines only |
On Windows
1 | conda install intel::mkl-static intel::mkl-include |
On macOS
1 | python3 setup.py develop |
20240219-sd模型
常见的模型有以下几类:
AI 生图模型需要大量的计算资源,如果你的电脑配置不够,那么即使你下载了模型,也可能无法运行,或者运行起来会很慢,生成一张图片可能要 30 ~ 40 秒。按照前面提到的类型,不同类型的模型对电脑配置的要求也不同。
对配置影响最大的应该是 Base、Inpainting 还有图生视频模型。目前,市面上没有一个官方统一的 AI 模型运行配置要求,但根据我的经验:
如果你是初学者,我会推荐你使用 DreamShaper 这个模型,它有基于 SDv1.5 的 Base 模型,也有基于 SDXL 的版本。同时配套也很不错。有 Inpainting 模型,也有 LCM 模型等。而且生成的效果也很不错。
如果只推荐一个模型的话,我会推荐 DreamShaper,首先它的成像质量不差,整体质感有点像 Midjourney。
其次,它的 SD v1.5 版本模型大小也不是很大,甚至比基础模型还要小一点点。
最后,也是我最喜欢的一点,它的配套模型比较丰富。有 LCM、Inpainting 模型,还有基于 SDXL Turbo 微调的模型。 对于电脑配置较差的朋友,我推荐你们使用 SD v1.5 的模型,即它的 V8.0 版本。
https://civitai.com/models/112902/dreamshaper-xl
如果你主要是以生成人像为主,那么 Realistic 风格模型是一个不错的选择。他们生成的人像质量比较高,且看起来更加真实。以下是两个基于 SD v1.5 微调的模型。
https://civitai.com/models/43331/majicmix-realistic
一般你会看到两种后缀的模型:
所以在上述的案例中,我会推荐你下载 safetensors 格式的模型。
另外,我建议你在搜索模型的时候,需要看看是不是该模型的官方发的,一般我会看模型的下载数,一般下载数越多的模型,越有可能是官方发的。
1 | conda create -n dfu python=3.10.13 |
1 | #读取diffuers库 |
1 | #接下来,我们就可以运行pipeline了 |
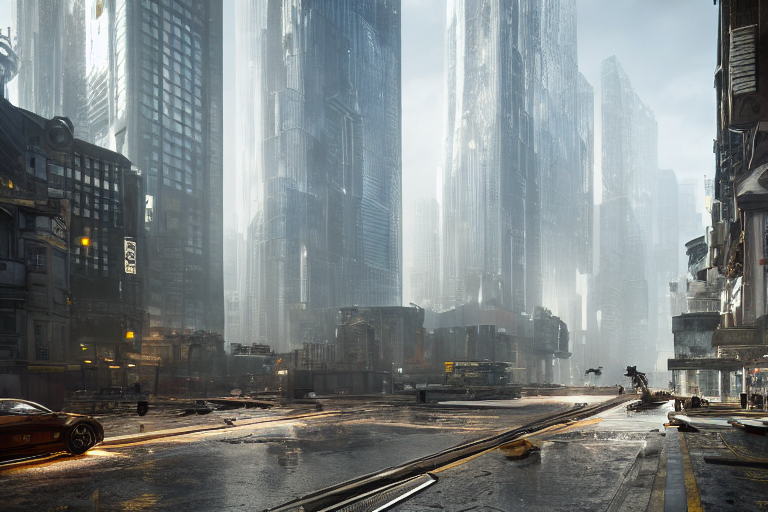
1 | prompt = "city future, 8k, exploration, cinematic, realistic, unreal engine, hyper detailed, volumetric light, moody cinematic epic concept art, realistic matte painting, hyper photorealistic" |